

How To Create Domain_6 Widget Id
In a previous tutorial, we took a deep dive into WordPress HTTP API and we learned what APIs are and how to use the HTTP API to consume web services.
I promised to show some real-world examples of how to consume APIs in WordPress using the HTTP API, this is the first in a series of upcoming articles.
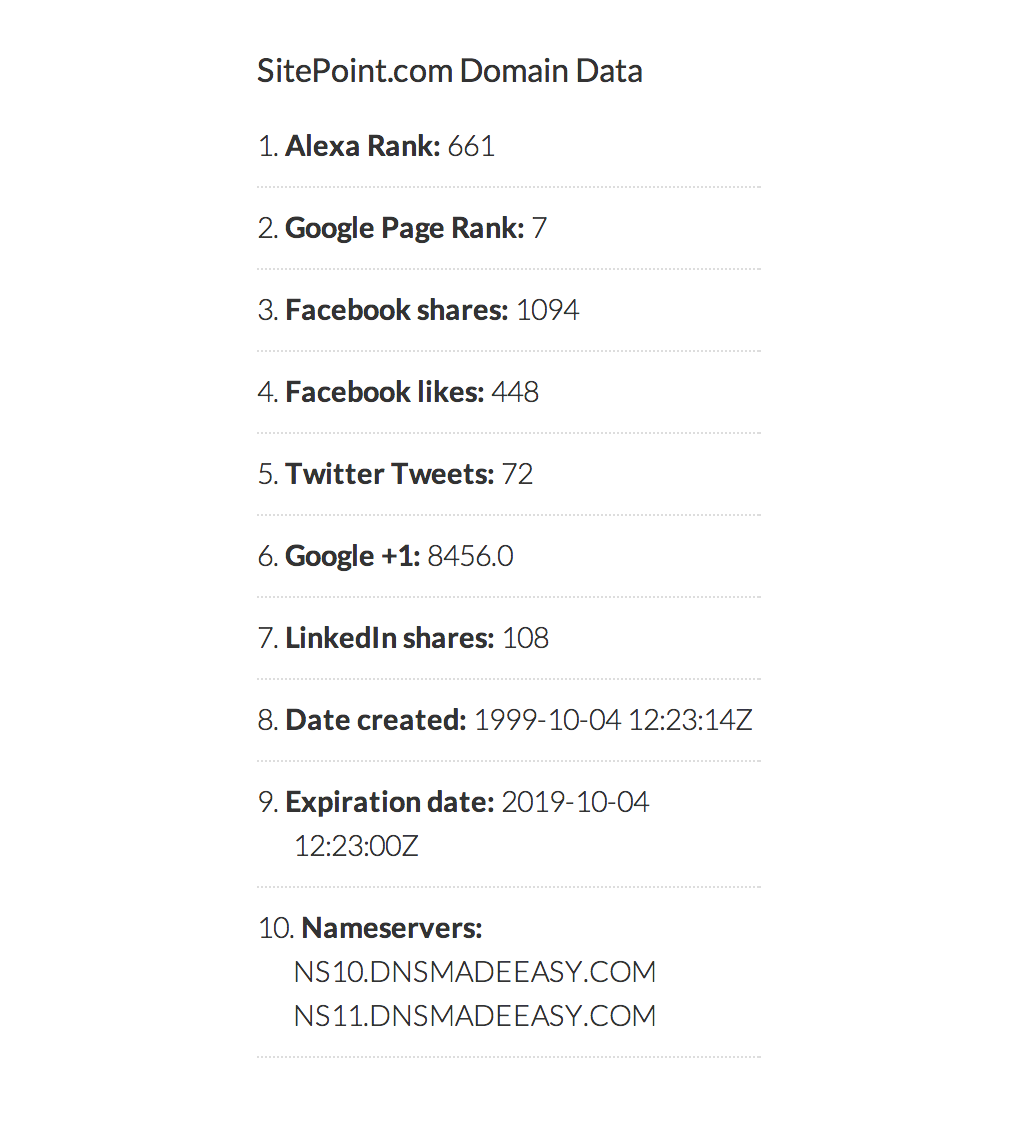
In this tutorial, we will develop a WordPress widget that display the WHOIS and social information of a domain name such as Google's PageRank and +1 count, Alexa rank, the date a domain was created, when the domain expires, DNS name servers, Facebook shares and likes count, Twitter tweets and LinkedIn shares.
The domain information listed above will be obtained from JsonWhois API.
To get this data, a GET request will be sent to the endpoint http://jsonwhois.com/api/whois with your API key and the domain name as the request parameters.
Enter the URL below into your browser to reveal available information (in JSON format) about the domain sitepoint.com:
http://jsonwhois.com/api/whois/?apiKey=54183ad8c433fac10b6f5d7c&domain=sitepoint.com It is from the JSON object the widget we develop will get its data from.
If you want to jump ahead in this tutorial, you can view a demo of the widget and download the widget plugin.
Coding the Widget
First off, include the plugin header.
<?php /* Plugin Name: Domain Whois and Social Data Plugin URI: https://www.sitepoint.com Description: Display whois and social data of a Domain. Version: 1.0 Author: Agbonghama Collins Author URI: http://w3guy.com License: GPL2 */ To create a WordPress widget; first extend the standard WP_Widget class, include the necessary class functions or methods and finally, register the widget.
Create a child-class extending the WP_Widget class.
class Domain_Whois_Social_Data extends WP_Widget { // ... Give the widget a name and description using the __construct() magic method as follows.
function __construct() { parent::__construct( 'whois_social_widget', // Base ID __( 'Domain Whois and Social Data', 'dwsd' ), // Name array( 'description' => __( 'Display whois and social data of a Domain.', 'dwsd' ), ) // Description ); } We will create a method called json_whois_api that will accept two arguments: the domain to query and your API key whose duty is to send a 'GET' request to the JsonWhois API, retrieve the response body and then convert the response to an object using json_decode() function.
/** * Retrieve the response body of the API GET request and convert it to an object * * @param $domain * @param $api_key * * @return object|mixed */ public function json_whois_api( $domain, $api_key ) { $url = 'http://jsonwhois.com/api/whois/?apiKey=' . $api_key . '&domain=' . $domain; $request = wp_remote_get( $url ); $response_body = wp_remote_retrieve_body( $request ); $decode_json_to_object = json_decode( $response_body ); return $decode_json_to_object; } For each piece of domain information the widget is going to display, a method that returns the individual data will also be created. That is, a method that returns the Alexa Rank, PageRank and so on will be created.
Worthy of Note
For those new to PHP programming and WordPress plugin development, you might find the something like this strange:
return $response_data->social->facebook->data[0]->share_count; The -> is used to access an object property and [] for accessing an array.
The reason for this is that the response return by JsonWhois after being decoded to an object is a multidimensional object with some property containing array as values.
The code below explains this $object->facebook->data[0]->share_count;
[facebook] => stdClass Object ( [data] => Array ( [0] => stdClass Object ( https%3A%2F%2Feditor.sitepoint.com => https://www.sitepoint.com [normalized_url] => https://www.sitepoint.com/ [share_count] => 1094 [like_count] => 448 [comment_count] => 161 [total_count] => 1703 [commentsbox_count] => 0 [comments_fbid] => 501562723433 [click_count] => 138 ) ) ) In no particular order, below are the class methods or functions that will return the various domain information the WordPress widget will display.
/** * Get the domain Alexa Rank * * @param object $response_data JSON decoded response body * * @return integer */ public function alexa_rank( $response_data ) { return $response_data->alexa->rank; } /** * Number of times domain have been tweeted * * @param object $response_data JSON decoded response body * * @return integer */ public function twitter_tweets( $response_data ) { return $response_data->social->twitter->count; } /** * Number of times domain have been shared on Facebook * * @param object $response_data JSON decoded response body * * @return integer */ public function facebook_share_count( $response_data ) { return $response_data->social->facebook->data[0]->share_count; } /** * Number of times domain have been liked on Facebook * * @param object $response_data JSON decoded response body * * @return mixed */ public function facebook_like_count( $response_data ) { return $response_data->social->facebook->data[0]->like_count; } /** * Number of times domain have been shared to LinkedIn * * @param object $response_data JSON decoded response body * * @return integer */ public function linkedin_share( $response_data ) { return $response_data->social->linkedIn; } /** * Number of times domain have been shared on Google+ * * @param object $response_data JSON decoded response body * * @return integer */ public function google_share( $response_data ) { return $response_data->social->google; } /** * Google PageRank of Domain * * @param object $response_data JSON decoded response body * * @return integer */ public function google_page_rank( $response_data ) { return $response_data->google->rank; } /** *Domain name servers * * @param object $response_data JSON decoded response body * * @return string */ public function domain_nameservers( $response_data ) { $name_servers = $response_data->whois->domain->nserver; return $name_servers->{0} . ' ' . $name_servers->{1}; } /** * Date domain was created * * @param object $response_data JSON decoded response body * * @return mixed */ public function date_created( $response_data ) { return $response_data->whois->domain->created; } /** * Domain expiration date * * @param object $response_data JSON decoded response body * * @return mixed */ public function expiration_date( $response_data ) { return $response_data->whois->domain->expires; } The back-end widget settings form is created by the form() method consisting of three form fields which house the widget title, domain and your API key.
/** * Back-end widget form. * * @see WP_Widget::form() * * @param array $instance Previously saved values from database. * * @return string */ public function form( $instance ) { if ( isset( $instance['title'] ) ) { $title = $instance['title']; } else { $title = __( 'Domain Whois & Social Data', 'dwsd' ); } $domain_name = isset( $instance['domain_name'] ) ? $instance['domain_name'] : ''; $api_key = isset( $instance['api_key'] ) ? $instance['api_key'] : '54183ad8c433fac10b6f5d7c'; ?> <p> <label for="<?php echo $this->get_field_id( 'title' ); ?>"><?php _e( 'Title:' ); ?></label> <input class="widefat" id="<?php echo $this->get_field_id( 'title' ); ?>" name="<?php echo $this->get_field_name( 'title' ); ?>" type="text" value="<?php echo esc_attr( $title ); ?>"> </p> <p> <label for="<?php echo $this->get_field_id( 'domain_name' ); ?>"><?php _e( 'Domain name (without http://)' ); ?></label> <input class="widefat" id="<?php echo $this->get_field_id( 'domain_name' ); ?>" name="<?php echo $this->get_field_name( 'domain_name' ); ?>" type="text" value="<?php echo esc_attr( $domain_name ); ?>"> </p> <p> <label for="<?php echo $this->get_field_id( 'api_key' ); ?>"><?php _e( 'API Key)' ); ?></label> <input class="widefat" id="<?php echo $this->get_field_id( 'api_key' ); ?>" name="<?php echo $this->get_field_name( 'api_key' ); ?>" type="text" value="<?php echo esc_attr( $api_key ); ?>"> </p> <?php } 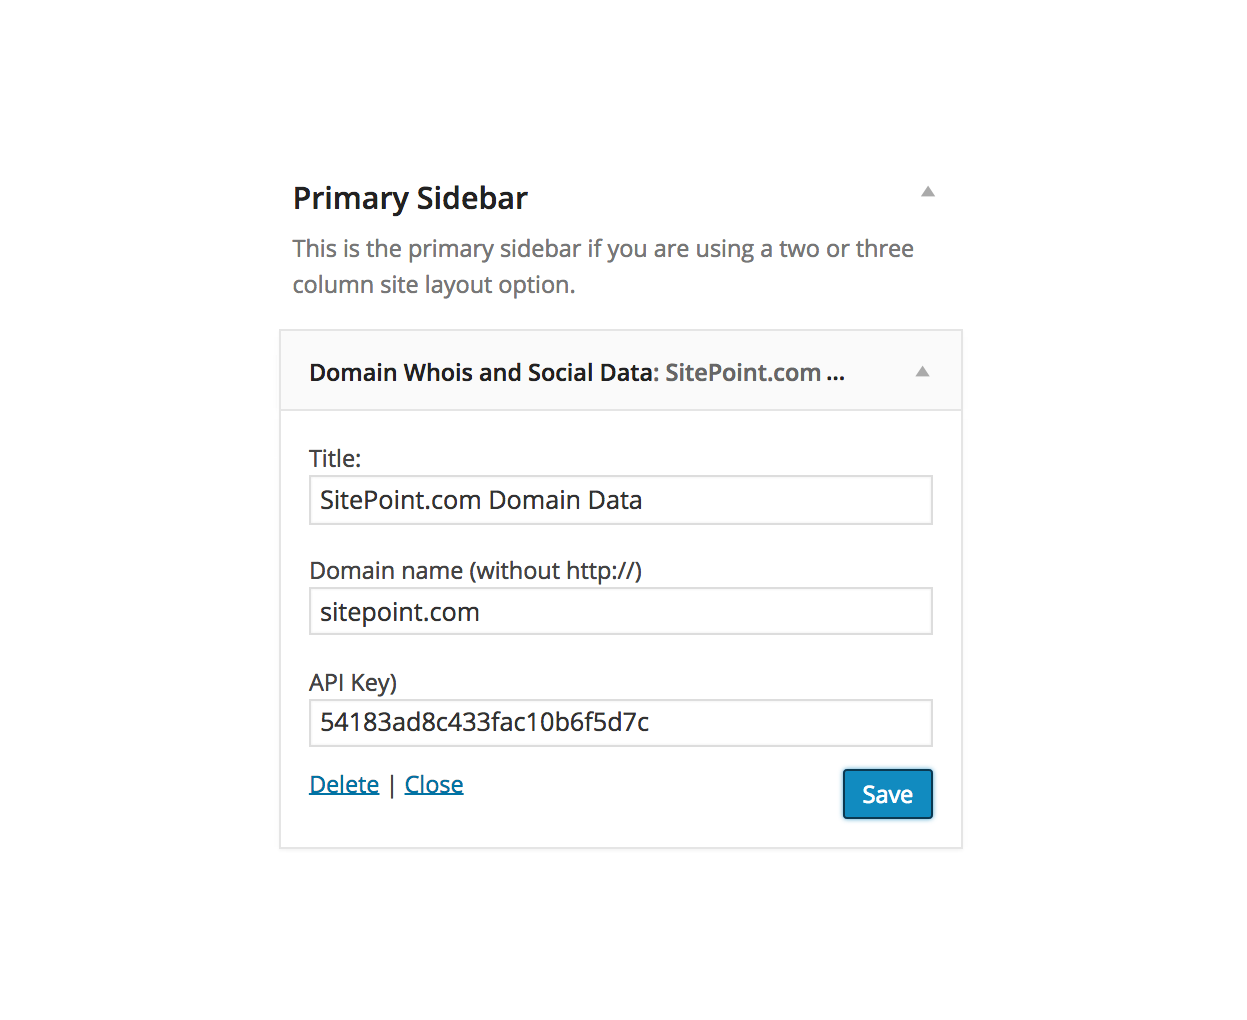
When the widget form is filled, the update() method sanitizes and saves the entered values to the database for reuse.
/** * Sanitize widget form values as they are saved. * * @see WP_Widget::update() * * @param array $new_instance Values just sent to be saved. * @param array $old_instance Previously saved values from database. * * @return array Updated safe values to be saved. */ public function update( $new_instance, $old_instance ) { $instance = array(); $instance['title'] = ( ! empty( $new_instance['title'] ) ) ? strip_tags( $new_instance['title'] ) : ''; $instance['domain_name'] = ( ! empty( $new_instance['domain_name'] ) ) ? strip_tags( $new_instance['domain_name'] ) : ''; return $instance; } The widget() method displays the widget in the front-end of WordPress.
/** * Front-end display of widget. * * @see WP_Widget::widget() * * @param array $args Widget arguments. * @param array $instance Saved values from database. */ public function widget( $args, $instance ) { // Retrieve the saved widget API key $api_key = ! empty( $instance['api_key'] ) ? $instance['api_key'] : '54183ad8c433fac10b6f5d7c'; // Get the Domain name saved in the widget $domain_name = ! empty( $instance['domain_name'] ) ? $instance['domain_name'] : ''; // JsonWhois API response $api_response = $this->json_whois_api( $domain_name, $api_key ); // Display the widget Title echo $args['before_widget']; if ( ! empty( $instance['title'] ) ) { echo $args['before_title'] . apply_filters( 'widget_title', $instance['title'] ) . $args['after_title']; } echo '<ol>'; echo '<li> <strong>Alexa Rank:</strong> ', $this->alexa_rank( $api_response ), '</li>'; echo '<li> <strong>Google Page Rank:</strong> ', $this->google_page_rank( $api_response ), '</li>'; echo '<li> <strong>Facebook shares:</strong> ', $this->facebook_share_count( $api_response ), '</li>'; echo '<li> <strong>Facebook likes:</strong> ', $this->facebook_like_count( $api_response ), '</li>'; echo '<li> <strong>Twitter Tweets:</strong> ', $this->twitter_tweets( $api_response ), '</li>'; echo '<li> <strong>Google +1:</strong> ', $this->google_share( $api_response ), '</li>'; echo '<li> <strong>LinkedIn shares:</strong> ', $this->linkedin_share( $api_response ), '</li>'; echo '<li> <strong>Date created:</strong> ', $this->date_created( $api_response ), '</li>'; echo '<li> <strong>Expiration date:</strong> ', $this->expiration_date( $api_response ), '</li>'; echo '<li> <strong>Name servers:</strong> ', $this->domain_nameservers( $api_response ), '</li>'; echo '</ol>'; echo $args['after_widget']; } Code explanation: First, the saved widget form values (title, domain and API key) are retrieved from the database and saved to a variable.
The domain and API key are passed to the json_whois_api method with the resultant response body saved to $api_response.
Calls to the various methods that return the domain data are made with the response body ($api_response) as an argument.
Finally, we close the widget class.
} // class Domain_Whois_Social_Data The widget class needs to be registered by being hooked to widgets_init Action so it is recognized by WordPress internals.
// register Domain_Whois_Social_Data widget function register_whois_social_widget() { register_widget( 'Domain_Whois_Social_Data' ); } add_action( 'widgets_init', 'register_whois_social_widget' ); Below is a screenshot of the widget.
View a demo of the widget.
Related Resources
If you're interested in learning more about how WordPress widgets work, you might be interested in the following articles:
- WordPress Widget API
- Build a Tabbed WordPress Login and Registration Widget
- Creating Widgets in WordPress via the Widgets API
- Creating a World Cup 2014 WordPress Widget
Wrap Up
To further understand how the widget was built and how to implement it on your WordPress site, download the widget plugin from GitHub.
As I mentioned, this article is the first in a series that will demonstrate how the WordPress HTTP API is used in a plugin.
Be sure to keep an eye on the WordPress channel for similar tutorials.
Until we meet again, happy coding!
How To Create Domain_6 Widget Id
Source: https://www.sitepoint.com/building-a-domain-whois-and-social-data-wordpress-widget/
Posted by: salasgrandise.blogspot.com
0 Response to "How To Create Domain_6 Widget Id"
Post a Comment